Showing posts with label decor. Show all posts

Saturday, April 16, 2016

GREEN GOALS


It is the WEEKEND! Can I get a hallelujah?! I really needed this weekend to just relax. I brought the pup to the dog park for a few hours. Went and bought some stuff for the new house. And scored this awesome neanthe belle. I may have a slight obsession with buying plants. I much rather buy plants than purses hehe! My husband says we are slowly making our way to looking like a jungle, but I don't see the problem with that ;)

I just adore nature. My body craves it. It makes me happy. Plants are not only beautiful to look at but they also have their health benefits. We all remember learning about photosynthesis in science class. Plants absorb the carbon dioxide that we release and in return they release oxygen that we absorb (inhale). Our relationship with plants is a beautiful thing isn't it? But there is more! According to Tree Hugger, "When photosynthesis stops at night, most plants switch things up and absorb oxygen and release carbon dioxide. However, a few special plants – like orchids, succulents and epiphytic bromeliads – flip that script and take in carbon dioxide and release oxygen. Meaning, use these plants in bedrooms to keep the oxygen flowing at night."


Another health benefit to having plants indoors is they help deter illness. The moisture that they produce is something our bodies desperate crave during the drier months. According to Bayer Advanced studies have shown that indoor plants have decreased dry skin, colds, and sore throats. UMMM how amazing is that?! I used to get sore throats a lot but ever since having our indoor plants, I have not had one sore throat!
The biggest plus that indoor plants provide and I am sure most of you know is, increase is purifying air! I think that this is huge especially with all the pollutants and toxins that we are exposed to everyday. It is nice to know that I am coming home to a place where the air is a bit cleaner and better for me!Now lets discuss their beauty! Plants are simply stunning. Whether a bouquet of flowers, a terrarium of succulents, a yucca, a palm plant, cacti, etc, plants are a beautiful and pure creation made by the hands of God and entrusted to us. I am eager for the day that I get to experience heaven because I envision it being filled with rows of sunflowers, luscious green fields, beautiful palms bordering gorgeous waterfalls....ok ok back to NOW...plants are a wonderful starting point to adding color in your home. They are not permanent and they are small which means you can constantly change them out and see what you like when it comes to color in a certain space. Not to mention your health will thank you in return!


What are your favorite kinds of plants? Go out this weekend and pick up a bouquet of flowers and a pretty vase and display them somewhere in your home that you spend a lot of time. Do you have an empty space in a particular room, go get a yucca plant (one of my favorites) it is animal safe (which BTW always check on the ASPCA website and make sure a plant is safe to have in your home if you have any pets!) and display it proudly in your living room or dining room or maybe even your entryway. OR you can get funky and hang your plants! 


If you don't have much floor or counter space hanging plants are an AWESOME alternative! I have my eye on this woven plant hanger for our bedroom ;) 
You see, you don't need to have a bright color rug, crazy wall colors, or say a green couch ;) in order to bring fun bold color into your home. A good starting place is plants.
Did you get some beautiful plants to display in your home? Take a photo and tag me on instagram @rebelydecor


happy decorating


Friday, March 18, 2016

NITTY GRITTY BEFORE PICTURES

Howdy guys! So if anyone has noticed, I have not been blogging too much lately :/ uhhhhh, sorry! Since we are in this moving phase I have not been doing too many projects around the apartment, well because it would be pointless since we are about to move!

UPDATE: We have been signing so much paperwork for our fixer upper of a home! At this point I don't even know what we are signing, we are just signing away hahah! Just kidding, we clearly read everything carefully before we sign! Thank God our realtor, broker, and contractor have been amazing through this whole process! They keep us informed with everything and answer all of my annoying questions that I will think of at like 2 in the morning haha.  For real though, they are such amazing guys, we are beyond grateful for them!
So for those of you who have been asking, we are so close to our closing! Hopefully within the next few weeks we will be closed and construction can begin!
So I wanted to show you guys some before photo's that I was able to get when we were over there last. I know once we sign at closing, things are going to move fast and I wasn't sure if I would be able  to get all the before pics that I wanted to get! So I went picture crazy! I won't share all of them because I took literally a TON but I will share the majority of them!

Our home is one of the only ones in the neighborhood that is set far back off the street! We are removing those two big trees. Sorry tree huggers but it is killing our front yard's grass!

The house is a pale yellow with blue shutters. I do not know who made this color decision. EW. We are brain storming what colors we want to do. We are def doing a black front door and black shutters and then the siding either grey or while. We shall see!

The hubby is excited about yard work! He is going to uproot all those sad looking bushing. I found some blue festuca grass and may night meadow sage that we are thinking of planting along the house! If you don't know what either of those plants look like, take a look:


Aren't they AMAZING?! They are vibrant which I adore but they are also low maintenance and drought tolerant...win, win!

I'm eager to make this little space welcoming! The lantern we are looking to get to replace this outdated one, it a matte black pineapple! I mean, come on! A pineapple to greet you at the door! How could you not love that?!


Ahhh the arched doorway! The beautiful accent to our home that makes my heart flutter every time I see it! The flooring is going to get ripped up and will match the rest of the house which will be laminate. The cabinets we are keeping cause despite their ugly appearance they are in GREAT shape so I am going to give them a little facelift. The counters will be new, new lighting to replace that hideous "hospital" light as I like to call it and new pretty stainless steel appliances!


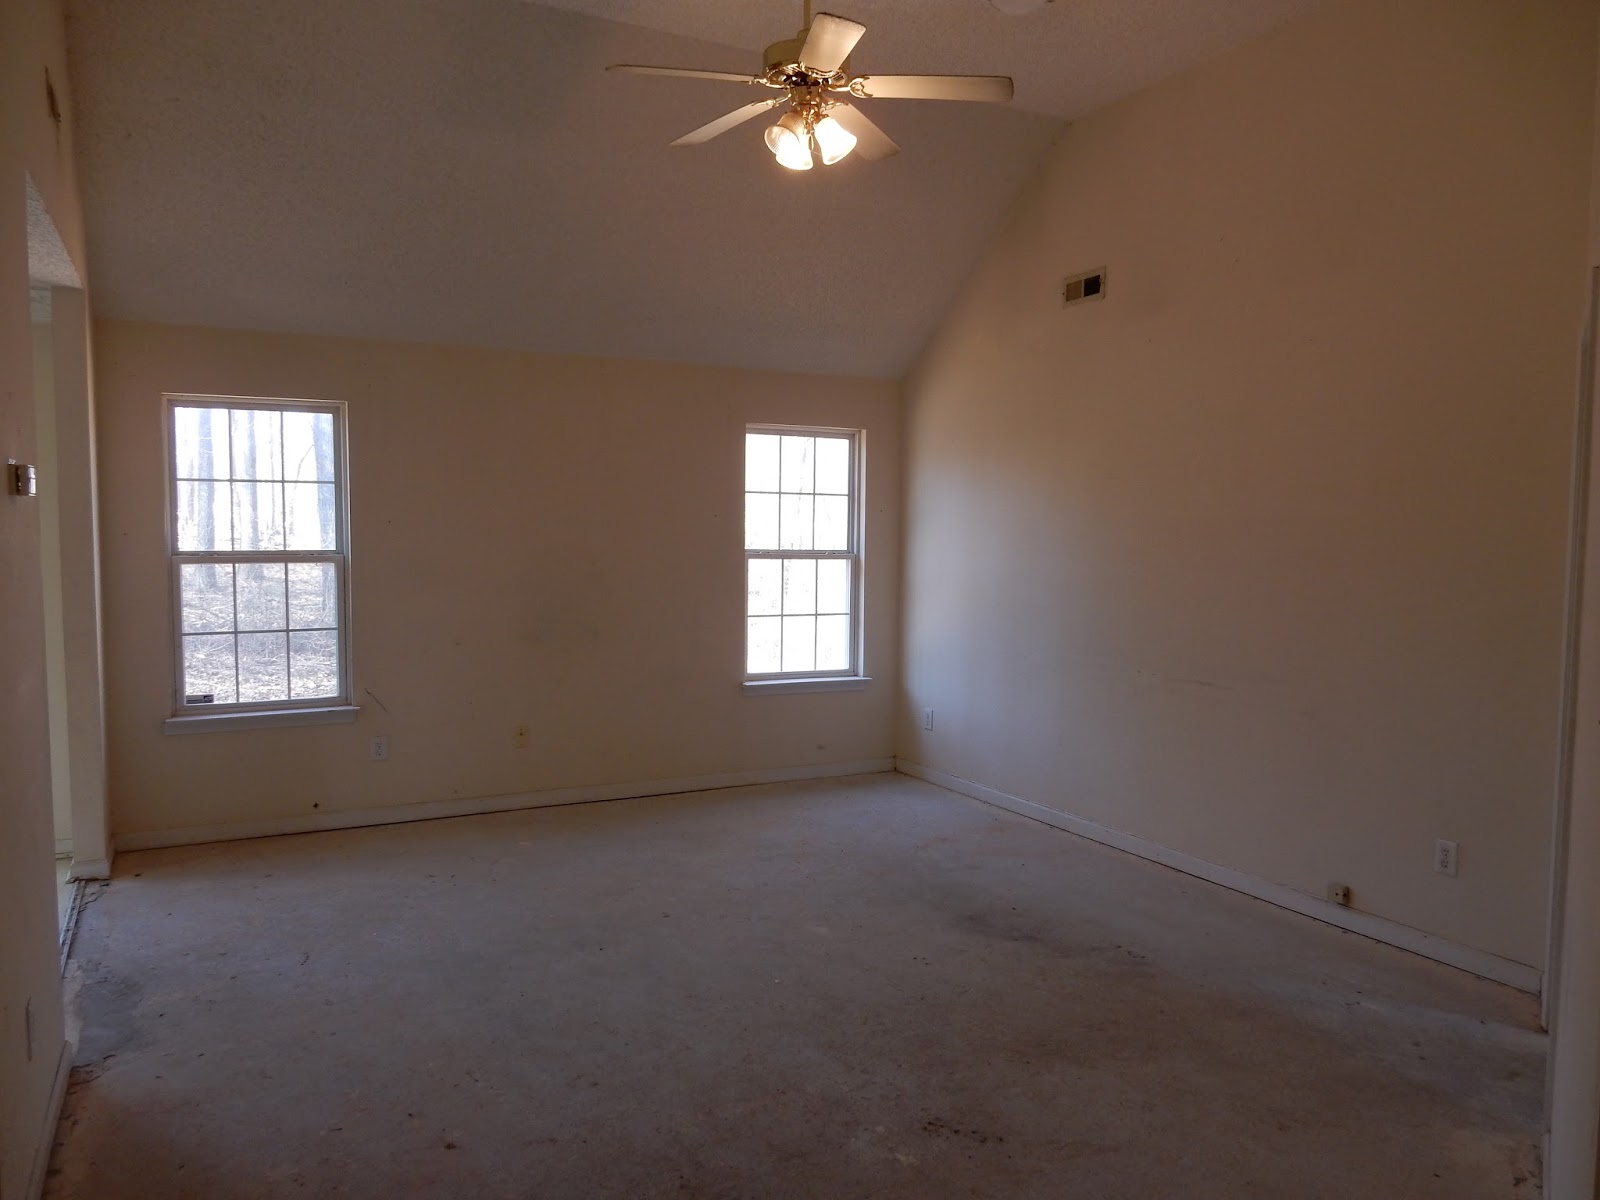
 I just adore our cathedral ceilings in the living room! We love high ceilings so this makes us so happy! The popcorn ceilings are going to be the first things that will be removed, thank God! Again, new floors throughout! A new ceiling fan. Originally we said we were going to do a wood beaded chandelier BUT then realized having a fan in there would be nice if it gets hot when we have company over during the cooler seasons when we won't be using our AC. We are going to do white paint throughout the whole house (Except the bathrooms. We will probably do them a super soft grey) We have a lot of bright pieces so I want them to be the focal point and the walls be a perfect backdrop for our furniture and accents. 

This is our dining area! I am super excited about this because I just found our dining table and it is every bit of gorgeous! It is this old, worn, rustic, some may say beat up; wooden circular table (with inserts if we need it bigger) I am SOOOO excited to put it in this space! We are still trying to decide on what type of lighting we want here. Wooden or metal? Probably metal since the table is so rustic. 

So there you have it! That was the main living area! Later I will share the bedrooms and bathrooms. Our bedroom is obviously the main bedroom that needs to be done, the other two we can take our time in putting together since there won't be an immediate use for them just yet!
We are so so sooooo excited to get started on making this place our own! Once the floors and ceilings are done we are going to move right in and live there while the rest is being done and then obviously do some ourselves over time! But the big things we want to get done now!
We cannot wait to share this process with you! The moment we get our keys and the crew gets in there, I can guarantee lots and lots of photos of the work being done!

happy decorating


Wednesday, October 28, 2015

A Touch Of Quirky


I love adding quirky and eclectic touches throughout our home if you haven't noticed. One trend that I see often in baby nurseries is fabric garland. There is something so whimsical and perfectly imperfect about the mixing and matching of fabric into the formation of garland to hang....really anywhere in your home.
Our headboard was the perfect canvas for my little project. Everything in our bedroom is stuff that my husband and I had prior to getting married. Our dressers and bed was my husbands, and our nightstands and headboard were mine. We painted them and made them our own but now we are in the process of getting more grown up stuff. Don't get me wrong, we LOVE what we have but some of it is childish....seriously, the dressers were my husbands since he was little haha. So eventually when we find pieces we like we will get them (thrifted of course). But until the search for new dressers happens I wanted to start on our master bedroom re-do and make a fabric garland for our headboard.

My vision for our bedroom is soft neutrals. Lots of whites and greys. But I wanted to add a whimsical touch and there is something so dreamy about fabric garland. So what better place than a bedroom where the dreaming takes place?!

I started with 5, 18x21 fabric squares from Wal-Mart. They were 97 cents a piece....STEAL! If you want your fabric strands to be longer you can buy fabric by the yard. I didn't want the fabric completely hiding my headboard so I opted for these squares.

I then took the squares and did 8 little cuts in each at about 1.5in apart to look like this. 
After doing this to each of the squares. I ripped each piece quickly. Your fabric will fray but thats ok, it gives it character!

You will end up with a pile of fabric that looks like this! I had 45 pieces of fabric in total. I then took a piece of twine about 5ft long and looped the fabric around the twine.
*There are different methods for doing this. You can knot it, twist it, loop it like I did...do whatever you like, it's YOUR project*

Once I finished I pinned the garland up onto our headboard and... voila!


Have FUN with it! Bedroom, living room, bathroom, nursery, etc. These adorable fabric garlands are the perfect touch of whimsical that your home is asking for! I can't wait to make some for Christmas to hang up around the apartment!


happy decorating


Sunday, October 18, 2015

COFFEE TABLE RE-DO & RUG REVEAL


If you have been to our apartment or have been following my blog and/or Facebook, you have come to realize I love quirky, loud, funky, eclectic items. Our apartment is as I like to call it, "eclectic chic". From bright colored velvet retro chairs, to gum ball machines ..we have a little bit of everything in our apartment.

However something that we did not have, but I have been searching for, for far too long was a Turkish style area rug for our living room. I have had an obsession with these styled rugs for a long time now. I mean just look at these gorgeous creations sent from heaven above ...


(they add the perfect Bohemian flare in this little ones nursery)

 (I swear I am drooling on my computer screen right now! That pattern. Those colors. Amaze balls!)

(In this neutral living room, it adds the perfect amount of color. It is strikingly beautiful but not obnoxiously loud)

You are obsessed now too, huh? It's ok, it is completely understandable. If you weren't slightly obsessed I would have to check your pulse to see if you were alive. 
So I searched, searched, searched. Mostly on sites such as craigslist or a page I follow on Facebook that is a community based page where people will sell things (mostly home goods) for a discounted price. But I had no luck. And I just wouldn't pay full priced for one because most of them have a starting price of $1,000 and "you see the way my bank account is set up" *side note* if you don't know what that quote is from you HAVE TO check out Kevin Hart's Stand Up Skit, it's HYSTERICAL!
Ok, so back to how darn expensive these sexy rugs are. Some can range up to$12,000! Disgusting, I know. So I do what I always do when I want things for cheaper, I go to Amazon. I typed in "Turkish Style Rug" and BOOM up pops a company that makes rugs for the CHEAP. And when I say cheap I mean cheap. Take a look at what I'm talking about HERE...and maybe in the process order one for yourself hehe.

I looked through a bunch of different options, and I found two that I liked and let my husband pick between those two. He did good, y'all!! Just look....

I love the way it looks with our new black wall!!


And our bright green and teal chairs. AHHH I am in love!

I am thrilled with it. And I must say, the price did not match the quality of this rug. I was shocked! It is extremely well made, it flattened out fast, and was true to color and size.....I'm still wondering why on earth I ever bought from any other company.

Because this rug is fabulous as can be but also very busy I had to re-do our coffee table. If you have been following my blog you know our coffee table use to look like this...
I painted it and then tufted the top with this retro printed fabric I found at Wal-Mart. It was great for the time being but with our new rug I didn't want the patterns to clash so I opted for something a lot more simple and rustic.

I originally wanted to take the entire top off the table but this thing was built like a fortress so I had to think of another plan. So I ended up taking the tufting off the table top, which took me FOREVERRRRR but whatevs, I got the job done. Then the next day I went to our local hardware store to pick up some 1x4 pieces of untreated wood and had the gentleman there cut it into 7 46" pieces. I also bought some PL Premium Polyurethane Adhesive. I put some of the adhesive on the tabletop and then placed the wood pieces on top of the adhesive. This adhesive is the BOMB DOT COM....however you want to use it on surfaces that aren't painted or treated and the table top of our coffee table had paint on it, so just for extra security I used 3" finishing nails cause they are thin and have a small head, and hammered a few into the wood. Those bad boy's aren't going anywhere AYEEE!
This is what it looked like once the wood was attached to the top. I ended up hitting the wood with a hammer in some places to give it a more distressed/worn look once the stain went on.

Next came the staining! I had a few different stain colors in my stash of paint and stains so I ended up using my favorite, Rust-Oleum's Antique Walnut.


I think that the best way to stain is to rub the stain into the wood and not brush it onto the top of the wood. I used this same stain on some shelves but I painted the stain on the shelves and it gave a painted look rather than a natural look which you will get when you rub the stain in. I took an old t-shirt of mine and cut a piece off, made sure to wear gloves cause getting stain off skin is a pain in the booty, and rubbed only one layer onto the wood. I could have done more but I liked the contrast of the light wood and the bright colored rug.

adorable, right?!


Voila' a new and beautiful coffee table!!

Do you have a coffee table that could use a little face-lift? Give it a try and tag me your re-do pictures on INSTAGRAM @rebelydecor, I would LOVE to see!

happy decorating


Saturday, October 10, 2015

A Home is Built in Time


Hey there décor people! I’m currently sitting on my couch with Mr. Rango watching Glee pushing off going food shopping cause this weather is STANKKKKKK. That and I have a butt load of stuff to do around the apartment. Our sink is just about to overflow, I have laundry that is screaming to be folded, a couch that needs vacuuming because Rango decided to shed and create another animal with all his hair…but as I stood in kitchen making a mental list of what needed to be done today, I just looked at our 900sq ft apartment and felt comfort, I felt at home. “Well duh, it is YOUR home, why wouldn’t you?” I shall explain. I have lived in 2 other apartments since being married, and in each one I was so focused on wanting brand new things cause I thought that is what would make me love our home, and when we couldn’t afford them I would get a bit bent out of shape. I wanted new furniture, I wanted a new headboard for our bed, I wanted a new dresser and this gorgeous tv stand that I had my eyes on for some time. You know, if we bought everything I wanted right away it would cost us a good 2 grand, AT LEAST. As newly weds and just starting out in our careers, dropping 2 thousand dollars was not a priority or realistic. And going into debt just because I wanted new things was not something we were willing to do.

SIDE NOTE If you like brand new things, if you can afford to buy high-end items for your home that is great! I have plenty of friends who do and their homes look stunning! I am not bashing that at all, REMEMBER this is a blog aimed towards BUDGET FRIENDLY DÉCOR and making a home beautiful for LESS!

Ok back to business……Soooooo, our first apartment I loved but I was not happy with it because I was not grateful for what we already had. I did not see the beauty in the hand-me-downs. I did not appreciate the things we got for the cheap. I was “OK” with it but was not thrilled. Then we moved to our next apartment. And I became more content. But that “content” feeling was brought about because I would spend way too much money on décor and then a month later not be happy and go and spend more money to replace the stuff I just bought a month ago. Example. I bought some new wall décor because we “needed it”, now almost a year later I have gotten rid of just about all of it. Not because it wasn’t nice, but because we did not need it. I overloaded on buying EVERYTHING AT ONCE and in doing so I bought things I eventually was not happy with. I just got them, to fill our space and it caused me to never feel at peace or comfort in a place that was supposed to be our home because I was never happy with what I already had and was constantly striving to make it better. Fast forward to our recent move to our current apartment. We got rid of A LOT and just kept the things we needed and loved. We kept my husbands dressers that he had since childhood, our couch (that I painted and love) and end table from my in-laws, our nightstands that I got in college, our 15$ book shelf from Wal-Mart that I painted, our coffee table that my in-laws gave me in college and I turned into an ottoman, our metal filing cabinet I found at Habitat For Humanity, our dining table our in-laws bought us, and a tv stand we got for 10$ at a thrift shop.
Our apartment was bare, it was simple, it was a blank slate and I LOVED IT!  I was not in a rush to fill it up and decorate it. I wanted to slowly add things to our home that I knew we would love and want to keep for years to come. My first purchase was an old pea green retro velvet chair. I am in serious love with this chair, like for real I just stare at it sometimes, it’s kind of weird. I found it at an antique mall and was able to bargain for it and got it for 40$. My next purchase was 2 yellow industrial bar stools cause we needed some seating at our bar since we don’t have a dining room in our new place. I was able to get both of the stools for 45$ (originally 90$). Since we got rid of our bigger couch to make more space, our sitting was a bit limited for when we had company over so I was then on the hunt for a chair. I was checking craigslist and different websites but I either found something I liked and it was expensive or I found something that was cheap and I was not thrilled about it. So for about 2 months we held off on getting anything and I kept searching and one day I found a vintage navy blue wingback chair in our neighborhood bulk dumpster! I freaked out! And just to clarify, the bulk dumpster was for furniture ONLY, no trash was in there, EW. I called my husband and told him to get his truck and we loaded the chair up, I sanitized it and now we have our extra seating and we didn’t have to pay a penny for it!
Over the next couple of weeks I collected some old frames for less than 1$ apiece and hung them up for some wall décor, I got some old items from thrift stores, I found some neat little items in Target’s HOT SPOT, shopped around our apartment and took things that we both had for years and refurbished them, and SLOWLY but surely our apartment has come together; in my opinion, BEAUTIFULLY. Every time I walk into our home I fall in love with it over and over again. I feel comfort and cozy, and not just because it’s a small apartment, but because almost every item in our apartment has meaning to it, whether given to us by our families, brought from childhood, from another era, previously owned,  or refurbished and given a second chance. It’s a special place, it’s home.
I have learned that your home does not need to be filled RIGHT AWAY. It does not need to be fully decorated within days of moving in. A home is made a home in time. It is the unique, old, run down, new, antiques, weird, family items that make your home YOURS!


happy decorating


Friday, July 31, 2015

So Fresh & So Clean


I love chalkboards if you have not noticed hehe! Ever since I discovered how to make chalkboard paint 2 years ago and then discovered they made it in spray paint and then actual paint, my life pretty much became complete, jk, but seriously -_- HOWEVER one thing I cannot stand about chalkboards is when they become foggy from all the chalk build up. And I feel no matter how much I prime my chalkboard I still freak out when I see even the slightest amount of chalk build up. (*how to prime your chalkboard* lay your chalk flat on the board and apply a coat of chalk all over and then erase, leaving a light white coating on the board. This will make erasing future chalk easier*) I guess it doesn't help that I draw something new on my chalkboard every week *whoops*. 
I have tried everything when it comes to cleaning our chalkboards throughout the house. I have done baby wipes, warm soapy water, a vinegar solution, the list could go on. But nothing seemed to truly get my chalkboards clean. I would get so excited when they became wet with whatever I was cleaning them with and for a minute or two the chalkboard looked nice and clean. THEN the board would dry and there was that nasty chalky, cloudy, annoying look that I hate so much. (If you own a chalkboard or went to school with chalkboards, you know what I am talking about). 

See what I mean? It just looks so ewwww!!! Looking at this photo is making me freak out a little inside!

SOOOOO, I did some research an I found a solution to my problem. COKE! Yes Coca Cola, cleans your chalkboard and makes it look brand new. I mean it makes sense right? When I needed to take rust off my bike I would use coke and steel wool. I mean it eats the paint off a car for goodness sake, that is sooo creepy/disgusting! I tried a sip, and not even joking, I wanted to throw up. I really don't understand why people like this stuff!

All you need is some Coke, a sponge, and a bowl to pour a little bit of the Coke into

The cleaning process is SO simple! All you have to do is wipe off your chalkboard with a paper towel or chalkboard eraser. Then pour some of the Coke into a bowl and dip your sponge in it and wipe your chalkboard down. After I wiped it down with the Coke sponge, I wiped the chalkboard down again with a paper towel and warm water just because I didn't want my dog licking the chalkboard cause he smelled something sweet on it AND I just imagined flies coming into our home because they smelled this God awful drink. *DO NOT, I repeat DO NOT use warm soapy water  on your chalkboard, it can leave a not so great film on the surface of the board!*

 BTW how disgusting is this?! The coke left a brown stain in my bowl after only 5 min of sitting in it. Can you imagine what it does to your body when it just sits in your stomach for hours?!


Once the chalkboard dries this is what it looks like! Oh my beautiful, gorgeous, sexy chalkboard how I love when you get all cleaned up for me ;) This looks like I just put a fresh coat of chalk paint on the wall! Who knew Coke could be so wonderful in this way?!

Then it was time to dress our chalkboard up! Rango is so amused by the falling chalk dust whenever I write or draw on our chalkboard. Silly puppy :P

VOILA


This sight makes my heart so happy! I swear it does not take much to please me. And seriously, how easy was that?! So go to Publix, Walmart, Food Town, Shop Rite, wherever you do your food shopping and pick up some Coke and get those chalkboard squeaky clean!

*UPDATE: Since doing this post, I have used soda besides Coke. I had Dr. Pepper in our fridge left over from yummy Dr. Pepper ribs and I gave it a shot and it worked just as well as the Coke*


happy decorating


Sunday, July 12, 2015

Industrial Rustic Shelves


This project has been one of my favorites thus far! I love adding metal accents to rustic pieces. There is something beautiful about the mixture of wood and metal. 
This DIY was super easy and very budget friendly! You can get everything you need right at Lowe's. 

They sell 8ft. long 2x4 for less that 3$ CHA-CHING! You can have someone there cut the wood for you at no charge, which is FABULOUSNESS. 


Next step? STAINING! They now have some super fun colored stains out there (grey, blue, pink, orange....etc), but I guess I am boring and stuck with Antique Walnut. Yup, that pretty much sounds like something my Granny would pick out :/ actually she would probably pick something more fun haha! I threw on 2 coats of stain (I could have probably gotten away with one coat but I do 2 to be safe). 

Then I bought some steel shelf brackets from Lowe's for between 3-4$ a piece. 
they have different sizes depending on the size of your shelf and depending on the look your are going for!

I broke out my handy hand drill and attached the wood to the brackets; then the brackets to the wall and THERE YOU GO! I decorated mine with some mason jars of course, a vintage flour and coffee container, and recycled apple juice and milk glasses. Our apartment does not have a ton of counter space or cabinet space so these nifty shelves were the absolute best addition to our kitchen walls!


happy decorating