Showing posts with label bohemian. Show all posts

Sunday, April 17, 2016

TIE DYE FOR ADULTS


Tie dye. When was the last time you did tie dye? Gosh, for me it was during summer camp when I was in elementary school. It was the typical obnoxious primary colors on a t-shirt that rarely got worn. 
Now you see "tie dye" popping up more and more when it comes to being incorporated into home decor. The biggest decor trend regarding "tie dye" is found in African indigo mud cloth. 
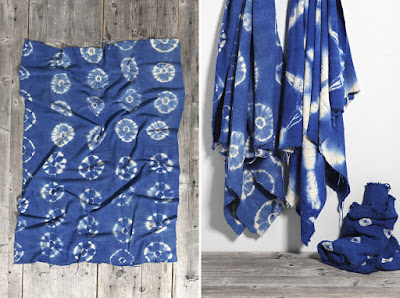
photo creds: Brit + Co

Tie Dye has been found to date back to between 500-810 AD in Peru, Asia, and Africa then being brought over to the Western world. Colors were found in nature from the use of berries and leaves being ground down into pulp and left outside to dry. Once they were dried out, ash and water was added to the died berries and leaves to create a dye. Then the hand woven fabric was twisted and manipulated different ways and dipped into the dye and left out to dry. It is truly amazing how ancient tie dying was done, and still is done today in some places!

Well I do not have the time nor patience to gather berries and leaves to make dye. Nor, do I have the time to hand weave fabric. I don't think any of us have that time. Well some do. But not me haha.

I wanted to make some fabric that I could use to cover pillows, and more specifically an ottoman that I just bought. So I went back to my childhood and had some tie dying fun!

WHAT YOU WILL NEED:
  • Tulip Fabric Dye Navy Blue (and black if you want a deeper color)
  • Cotton, linen, or some other type of natural fiber fabric
  • Large plastic container
  • Rubber bands (of different sizes)
  • Plastic drop cloth


I wanted to give the fabric I picked out two different types of patterns. For pattern one, I folded the fabric to look like this

To achieve this, all you need to do is take your fabric and fold it like you did construction paper when you were little and made paper fans. So horizontally fold the fabric like an accordion. Once you get to the end, roll the fabric up like a cinnamon bun and put a rubber band around it to secure it. Where ever you put the rubber band is where the dye will stop running up the fabric. It acts as a barrier. 

For the second pattern, I folder the fabric to look like this

For this pattern. You are going to do the same accordion folding and then fold it in half and do different ized rubber bands going down the fabric. I did a few overlapping each other to give it a thicker area that will remain white. (Next time I will probably get a bit thicker rubber bands)

Follow the directions on the bottle of dye for proper dying. For mine I boiled 2 gallons of water and added half a bottle of my dye to it. Next time I will probably add the whole bottle OR add half of the Navy blue bottle and half of a black bottle of dye to give it a deeper more drastic color.

I then placed the fabric in the dye for 10 minutes.

With the fabric that was rolled up. You just want to stand it upright in the dye. You will see the dye start to travel up the roll but don't worry, it will stop at the rubber band. My water did not cover my fabric, so I rotated it throughout the 10 minutes. 

After the 10 minutes I took the fabric out of the dye and let them sit on the plastic drop cloth for 5 minutes. Then, I took the rubber bands off and hung the fabric up to dry (which only took 2 hours).


Ain't she a beaut?!

See why next time I will use thicker rubber bands? I want the white lines to be a bit thicker. But hey it's ok, as long as I and YOU can learn from it!

Once they were dry, I washed them in cold, JUST cold water. No detergent. NADA but COLD WATER. I washed mine on delicate. The color may fade a bit, which is another reason you might want to add a little black to your dye mixture or add a whole bottle of the navy blue. Have fun with it, experiment with the colors. Then, I dried them on medium heat and ironed them to lock the color in and obviously smooth out any wrinkles.

I ended up using pattern TWO to recover a new ottoman I just bought. This was the ottoman BEFORE

I scored it at GOODWILL with a matching coffee table ALL for only $10! When the worker at GOODWILL told me they came together I literally said,  "SHUT UP! Well I don't mean shut up, but I am shocked! I'll take it!" All it needed was a little loving'

And here it is AFTER with the new fabric 
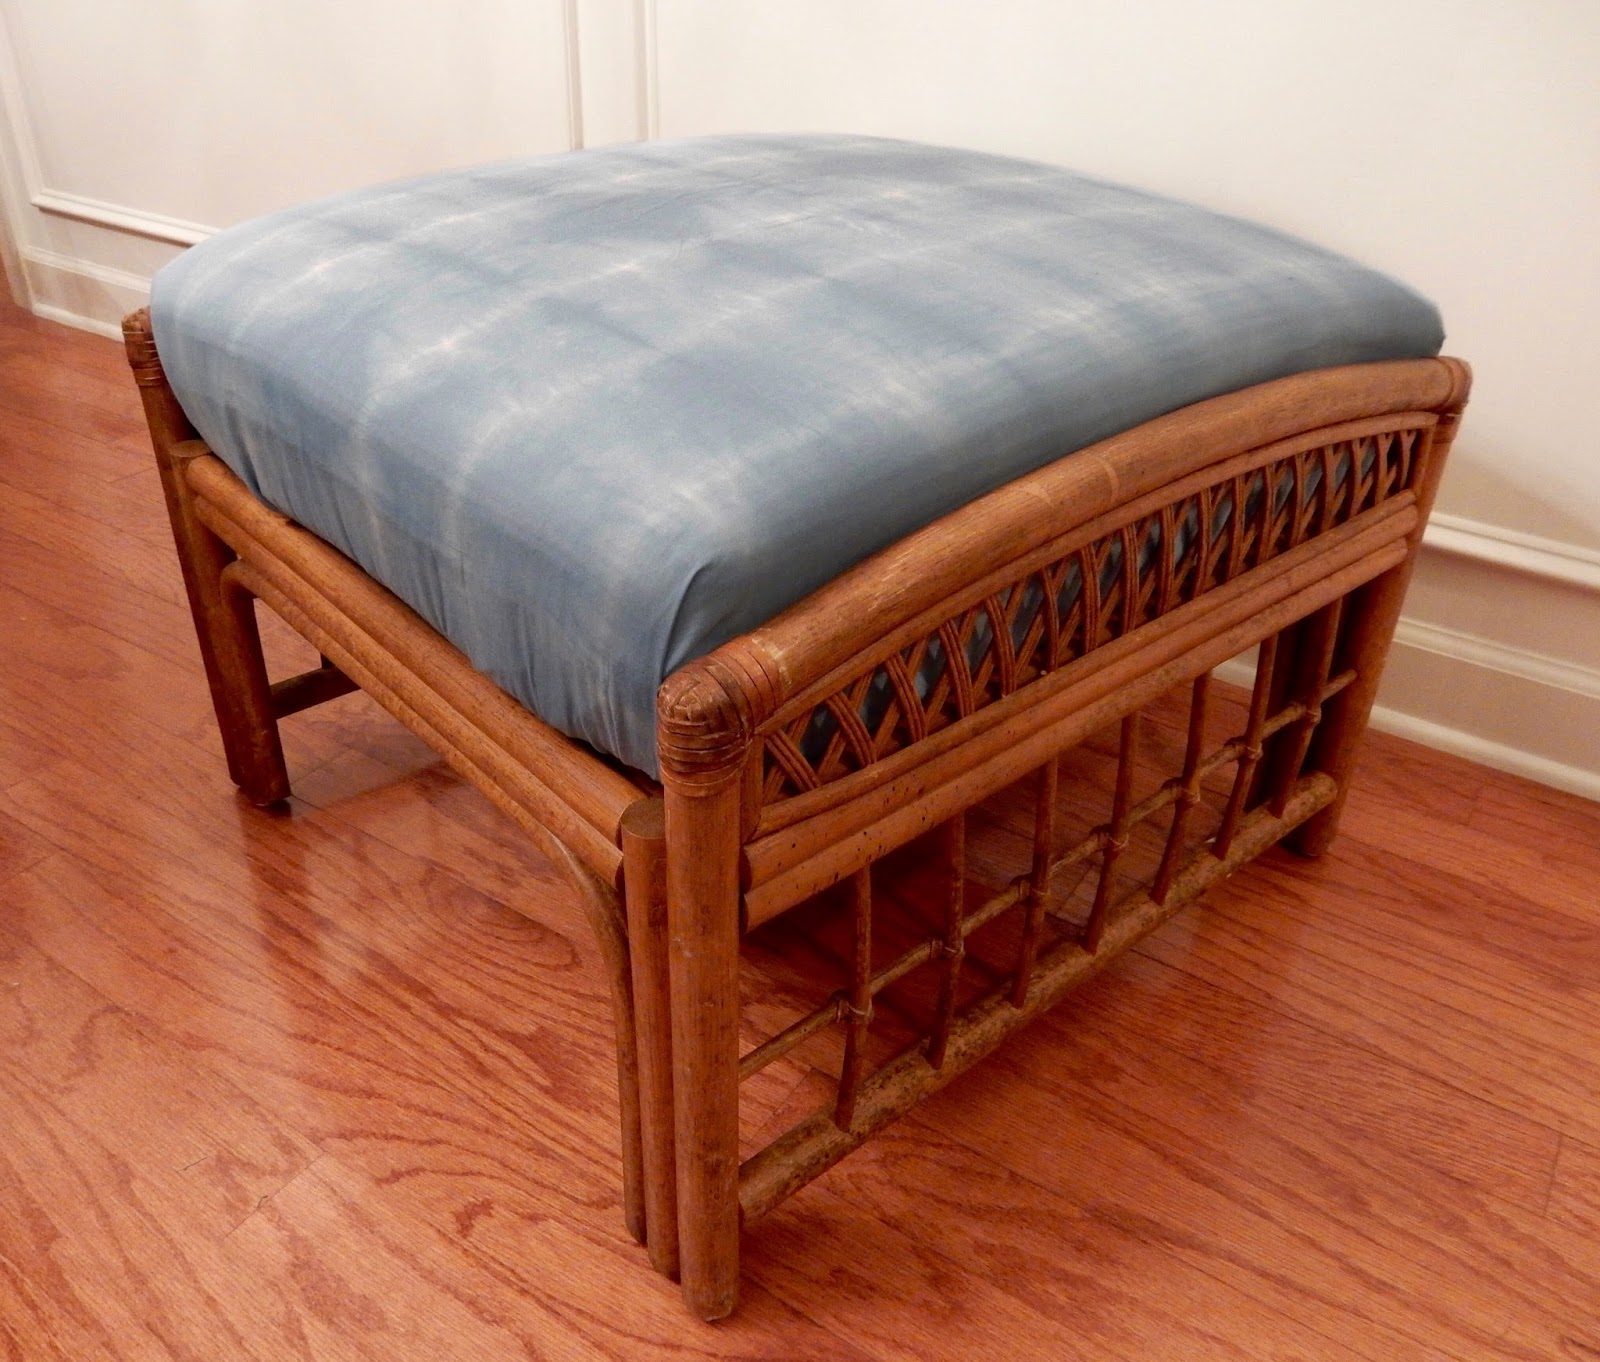
SO MUCH BETTER! 

Tie dye is no longer a little kid activity! It CAN be for adults and it can be used in fun and unique ways for home decor. I'm going to end up using pattern ONE for some throw pillows ;)

*UPDATE*
I ended up experimenting with dye colors and I found the perfect mixture. Like I stated above, I bought Tulip (powder) black dye. I mixed half of the packet of black dye with a bottle of Tulip (liquid) navy blue dye in 2 gallons of water. I let the fabric sit in the water for 15 minutes. I stirred it for 10 minutes and let it sit for 5 minutes. And WOW! It made a BIG difference.

It is actually indigo now and not that soft blue (which I still like and am going to use but I had in mind indigo for our ottoman).

And since it came out the color I intended it to be, I ended up recovering our ottoman

SO, SO much BETTER! And it will find more stains ;)


happy decorating


Saturday, April 16, 2016

GREEN GOALS


It is the WEEKEND! Can I get a hallelujah?! I really needed this weekend to just relax. I brought the pup to the dog park for a few hours. Went and bought some stuff for the new house. And scored this awesome neanthe belle. I may have a slight obsession with buying plants. I much rather buy plants than purses hehe! My husband says we are slowly making our way to looking like a jungle, but I don't see the problem with that ;)

I just adore nature. My body craves it. It makes me happy. Plants are not only beautiful to look at but they also have their health benefits. We all remember learning about photosynthesis in science class. Plants absorb the carbon dioxide that we release and in return they release oxygen that we absorb (inhale). Our relationship with plants is a beautiful thing isn't it? But there is more! According to Tree Hugger, "When photosynthesis stops at night, most plants switch things up and absorb oxygen and release carbon dioxide. However, a few special plants – like orchids, succulents and epiphytic bromeliads – flip that script and take in carbon dioxide and release oxygen. Meaning, use these plants in bedrooms to keep the oxygen flowing at night."


Another health benefit to having plants indoors is they help deter illness. The moisture that they produce is something our bodies desperate crave during the drier months. According to Bayer Advanced studies have shown that indoor plants have decreased dry skin, colds, and sore throats. UMMM how amazing is that?! I used to get sore throats a lot but ever since having our indoor plants, I have not had one sore throat!
The biggest plus that indoor plants provide and I am sure most of you know is, increase is purifying air! I think that this is huge especially with all the pollutants and toxins that we are exposed to everyday. It is nice to know that I am coming home to a place where the air is a bit cleaner and better for me!Now lets discuss their beauty! Plants are simply stunning. Whether a bouquet of flowers, a terrarium of succulents, a yucca, a palm plant, cacti, etc, plants are a beautiful and pure creation made by the hands of God and entrusted to us. I am eager for the day that I get to experience heaven because I envision it being filled with rows of sunflowers, luscious green fields, beautiful palms bordering gorgeous waterfalls....ok ok back to NOW...plants are a wonderful starting point to adding color in your home. They are not permanent and they are small which means you can constantly change them out and see what you like when it comes to color in a certain space. Not to mention your health will thank you in return!


What are your favorite kinds of plants? Go out this weekend and pick up a bouquet of flowers and a pretty vase and display them somewhere in your home that you spend a lot of time. Do you have an empty space in a particular room, go get a yucca plant (one of my favorites) it is animal safe (which BTW always check on the ASPCA website and make sure a plant is safe to have in your home if you have any pets!) and display it proudly in your living room or dining room or maybe even your entryway. OR you can get funky and hang your plants! 


If you don't have much floor or counter space hanging plants are an AWESOME alternative! I have my eye on this woven plant hanger for our bedroom ;) 
You see, you don't need to have a bright color rug, crazy wall colors, or say a green couch ;) in order to bring fun bold color into your home. A good starting place is plants.
Did you get some beautiful plants to display in your home? Take a photo and tag me on instagram @rebelydecor


happy decorating


Tuesday, April 12, 2016

MAKING A BIG SPLASH

Hey y'all! I feel like I have apologized multiple times for being some-what M.I.A for the past few weeks. With the project of our new house coming up there has been a lot of ins and out and paperwork galore. But we finally see the light at the end of the tunnel! We got the news that we will be closing on our house in 7 days! I cannot tell you how overjoyed we were when we found out! I must have done the happy dance a dozen and one times. 
With our closing date right around the corner we have been getting everything laid out. Such as:

Paint colors
Counters
Lighting
Appliances
Flooring
(and my favorite) Backsplash


If any of you read my BLACK AND BOLD KITCHEN post a while back you saw that we were originally going to go for black cabinets with gold hardware and a white subway tile backsplash. WELP that changed! My husband mentioned doing a white kitchen. I immediately looked at him like "WAIT, WHAT?" Not that there is anything wrong with a white kitchen but it was just so opposite from what we had planned originally.

For a while, I wrestled back and forth with the idea of a white kitchen. I told my husband, "I'm ok with doing a white kitchen, but the backsplash needs to be funky!"
I got to ordering tons of samples. I found some Mexican tiles, glass tiles, subway tiles, tile upon tiles! My husband was like, "where the heck did all these backsplashes come from?!" Hehe 

So we narrowed it down to two options. Both of which are from Glass Tile Oasis. 
The Purple Purple Iridescent (left) and the Green Green Iridescent (right).

We loved the Purple Purple and the moment it came in the mail I was sold on having a white kitchen. But then the Green Green came and we liked how it was still funky but a bit muted so we decided on that. BUT then we looked back at our kitchen and the square footage that makes up the backsplash is so small...take a look


There will be backsplash to the left of the fridge, the small portion (not pictured) by the sink


And then the wall where the stove will be. Because there isn't that much wall that will be getting covered we decided it would be best to do the Purple Purple . Everything else is going to be white. White cabinets, white high gloss counters, white paint so we wanted there to be a bright wow statement and I think that this backsplash will be just that.


I love how it changes color is different lighting. Our kitchen gets TONS of great light all throughout the day so I am eager to see what it looks like at different hours of the day.

Along with the white on white kitchen and Purple Purple backsplash; we are of course, keeping our idea of doing gold hardware for the cabinets and gold pendant lighting.

I was nervous at first to do something other than black cabinets but with this backsplash I feel we cannot go wrong! To say that we are thrilled to see our house come together is an understatement! 
I am eager to hopefully share some progress with you all next week when our contractors team gets in there and starts making magic!

happy decorating!